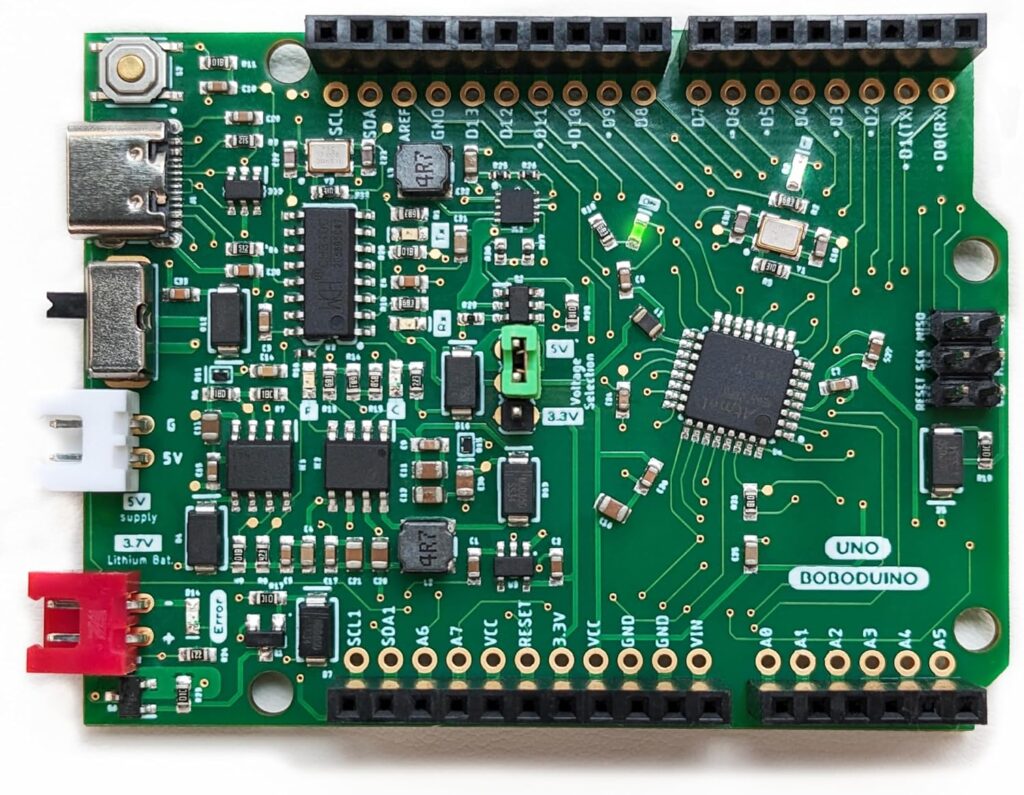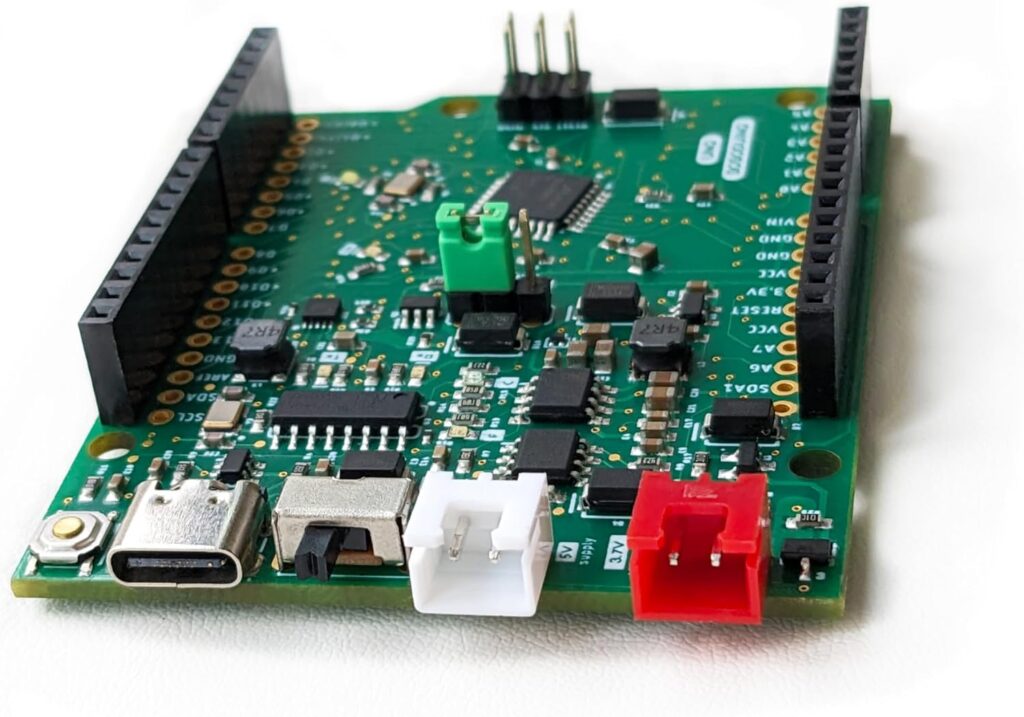
A development board with USB-C,
lithium-ion battery charging, and a 5V/3.3V switch !
- Boboduino environment setup cheatsheet: Setup the environment with this if you are already an expert!
- User Manual download(PDF) 🌟
Introduction
- What’s Boboduino Uno R3?
- Introducing BOBOBUINO UNO
- Pinout explanation
- Comparison and compatibility between Boboduino UNO and Arduino Uno
- User Manual download(PDF) 🌟
Environment setup
You will need to install three things for you to start your microcontroller journey:
- Install the Arduino IDE
- Arduino IDE installation 🦄 Arduino IDE is the environment we loved so much to write our codes.
- USB driver installation(CH340G)
- USB driver installation (CH340G) 🎮 The USB driver letting your Boboduino to be recognized by your computer.
- Setup 3rd-party board
- Boboduino MiniCore Arduino IDE environment setup 🦊 The Boboduino MiniCore help your Arduino IDE to recognize this 3rd-party board.
Boboduino environment setup cheatsheet: Setup the environment with this if you are already an expert!
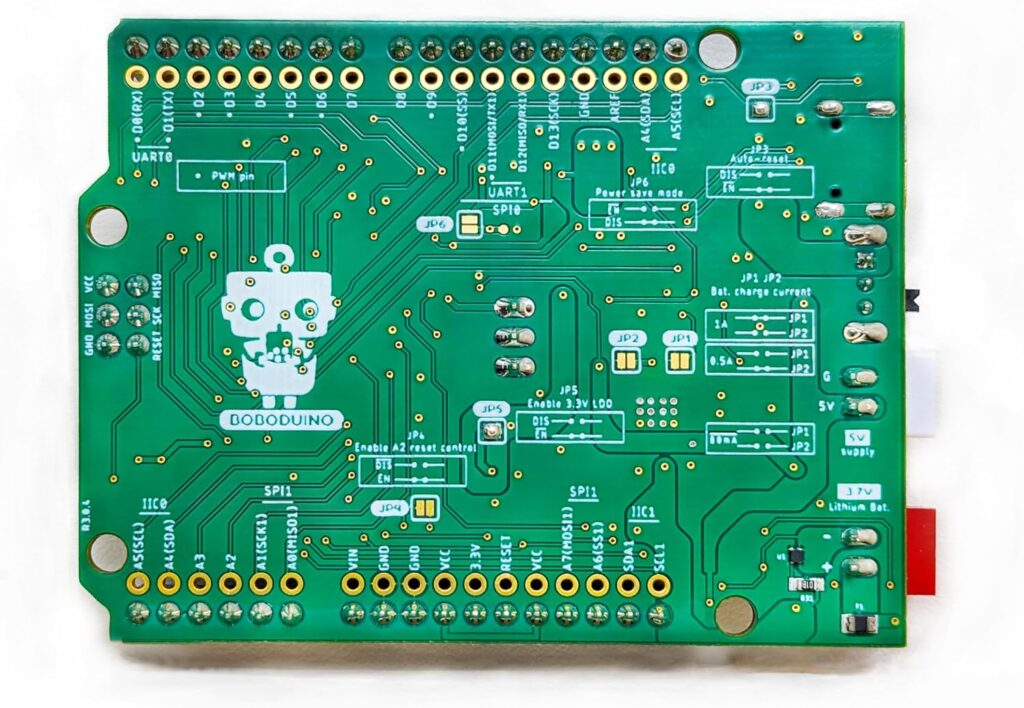
Main features
Some useful features that you can only find on the Boboduino board
- How to adjust the jumpers
- Power System, Battery Selection, and Charging Function
- 5V/3.3V switch
- PWM/IIC/SPI
- Re-write the bootloader
Error message
Resolving ‘You Don’t Have Permission to Open the Application’ Message on Mac: A Simple Guide
Frequently asked questions
Here are the frequently asked questions. Please let us know if you have any further questions.
Can I use the Arduino IDE or PlatformIO with this board?
Yes, you can develop your project using both the official Arduino IDE and PlatformIO.
How to set up the environment when you’ve just received the board?
You’ll need to accomplish two things:
- Install the BOBODUINO board from additional boards manager and board manager.
- Install the CH340G driver for USB connection.
What is the recommended development environment?
For beginners, it’s recommended to use the Arduino IDE for development. When you need to write more complex programs, using PlatformIO is advised. In PlatformIO, you’ll have more powerful features like including header files and error detection. Of course, you can also start learning with PlatformIO right from the beginning.
This is just a placeholder to help you visualize how the content is displayed in the tabs. Feel free to edit this with your actual content.
Why isn’t the board being detected by the computer?
Here are the issues you need to check:
- Have you installed the CH340G USB driver?
- Are you using a Type-C USB cable with transmission capability? (Some USB cables can only be used for charging devices, like the ones found in the accessories of fans or toys)
If you’ve already installed the driver but the board still can’t be detected, you may need to perform the following tests:
- Try using a different cable.
- Check if you’ve flipped the black switch to the side of the USB port.
- Verify if the power LED indicator is lit up.
- If the board still can’t be detected after performing checks 1, 2, and 3, try restarting your computer.
- These steps can usually resolve the issue when your computer has been able to detect the board before.
Why did the program upload fail?
You can check if the following issues have occurred:
- Is there any any code typos, resulting in compilation errors?
- Is the board not being recognized? Try unplugging and re-plugging the USB cable.
You can use ChatGPT or Google to search for solutions to the generated error questions.
How to choose the battery? What should be noted when charging?
- Select lithium-ion or lithium-ion polymer rechargeable batteries with overcharge and over-discharge protection circuit.
- Do not connect the board with any other kind of battery.
- Purchase the battery from a well-known source (such as SparkFun or AdaFruit), and choose a battery with certification.
Can I use a regular 18650 lithium battery?
Yes, remember to choose the one with certification, and then add a lithium battery protection board for extra safety!
What is the default charing rate?
The default charging current is set to 80 mA. This is much more suitable for small and medium-sized batteries.
How to adjust the battery charging current?
To adjust the charging current, you will need to use a soldering iron to solder the soldering jumper located on the back of the circuit board. You can switch the charging current to 80mA, 500mA, or 1000mA. It’s highly recommended to charge the battery at or below 1/2C(which means charging it at the half speed .
When saying charging the battery with 1/2C. what does it mean?
When referring to charging a battery with “1/2C,” it means charging the battery at a current rate that is equal to half of its rated capacity (C). In the context of batteries, “C” represents the battery’s capacity in ampere-hours (Ah). Charging at a rate of 1/2C means that the current flowing into the battery during charging is half of its capacity.
To give a clearer explanation, let’s say you have a battery with a capacity of 1000 mAh (which is equivalent to 1 Ah). Charging the battery at 1/2C would mean charging it at a current of 500 mA (milliamperes), which is half of its capacity. This charge rate is often used to describe how fast a battery is being charged relative to its capacity. It’s important to note that charging a battery at higher or lower rates can have implications for the battery’s performance, lifespan, and safety.
Can Boboduino Monitor battery charging?
Yes, we can build it by connecting one analog pin to the battery pins. However, since the charging is controlled by the chip, we are not able to control the charging.
What are the differences between BOBODUINO and Arduino R3?
There are several main differences:
- BOBO uses a more convenient Type-C USB cable.
- The voltage potential can be switched between 5V and 3.3V.
- BOBO can charge lithium-ion batteries and can also be powered by lithium batteries.
What are the major difference between the BOBODUINO Uno R3 with official Arduino Uno R4?
In terms of specifications, the R4 employs a 32-bit MCU, suggesting that the performance of its MCU should outperform that of the BOBODUINO. However, because most open-source projects still only support 8-bit MCUs, there might be a period during which many libraries are not fully compatible. If you need to develop on top of someone else’s code or library, this could pose a slight hindrance.
BOBODUINO falls short of the R4 in terms of Flash memory and SRAM (32KB flash, 2KB SRAM), compared to the R4’s 256 kB Flash and 32 kB SRAM. However, for most applications and learning scenarios, the space provided by Flash memory and SRAM is generally sufficient, so in practical usage, there wouldn’t be a significant difference.
Lastly, when compared to the R4, BOBO offers an additional set of UART, I2C, and SPI ports, along with a jumper that allows for a direct adjustment between 5V and 3.3V. To be honest, comparing the specifications of the MCUs between these two is somewhat meaningless, as these types of development boards are primarily used for learning and quickly creating interesting projects. If you’re looking to learn about AI or machine learning, there are other products more suitable than these two.
Boboduino images